No More After Effects? Premiere Pro's AI Masking Is Here

Table of Contents
- Getting Started with Object Masking
- Understanding the Four Masking Tools
- Step 1: Create Your First Object Mask
- Step 2: Track Motion Across Your Clip
- Step 3: Apply Effects to Your Masked Subject
- Working with Shape Masks
- Advanced Mask Refinement Techniques
- Combining Multiple Masks
- Tracking Performance and Quality Options
- Managing Mask Data and Projects
- Essential Keyboard Shortcuts and Tools
- Troubleshooting Common Issues
- Best Practices for Professional Results
- Performance Tips and System Requirements
- Integration with Other Premiere Pro Features
- What's Coming Next
- Getting Professional Results
- Frequently Asked Questions
- Spotlight FX - Get free transitions, effects and workflow tools
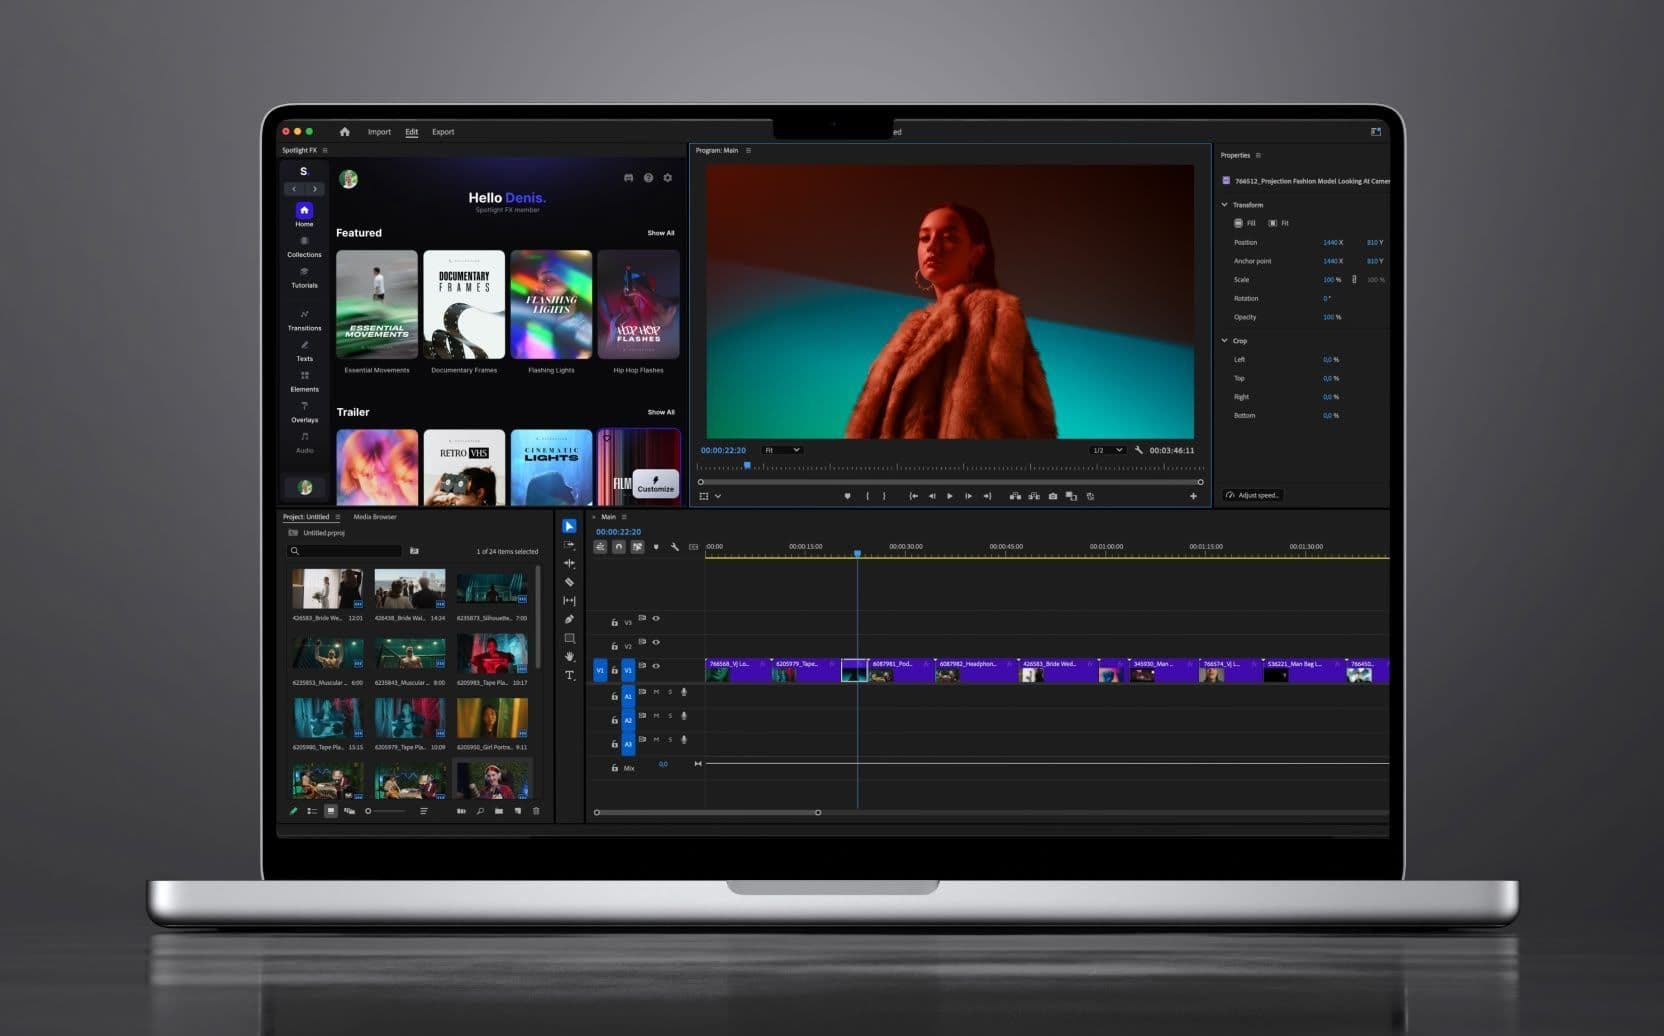
Looking at footage where you need to blur someone's face or apply color grading to just one person? The old workflow meant jumping between Premiere Pro and After Effects, which could take forever for what should be straightforward tasks. Adobe's new AI-powered object masking in Premiere Pro changes all that.
This feature automatically identifies people and objects in your clips, creates precise masks with one click, and tracks them throughout your footage. I've been testing this in the beta version, and the difference in workflow speed is remarkable. What used to take 30 minutes of manual keyframing now happens in under two minutes.
Getting Started with Object Masking
Before you can use these new tools, you'll need to enable them in Premiere Pro Beta version 25.6 build 48 or later. When you launch the beta, you might see a dialog asking if you want to enable new masking. Click "Enable new masking" and you're ready to go.
If you missed that dialog, don't worry. Open any project, then look for "New Masking" in the beta menu at the top of your screen. Select it and Premiere Pro will restart with the feature enabled.
Important warning: Projects created with new masking won't open in regular Premiere Pro 2025 or earlier versions. Think of this as a one-way upgrade for any project you enable it on.
Understanding the Four Masking Tools
Premiere Pro beta now includes four distinct masking tools, each designed for specific situations:
Object Mask Tool uses artificial intelligence to automatically detect people and objects. This is the star of the show and works incredibly well for common subjects like faces, bodies, cars, and buildings.
Ellipse Mask Tool creates circular or oval shapes, perfect for traditional face masking in color grading work. You can hold Shift while dragging to create perfect circles.
Rectangle Mask Tool generates four-sided shapes, ideal for masking screens, signs, or architectural elements. Hold Shift to create perfect squares.
Pen Mask Tool allows free-form drawing with Bezier curves, giving you complete control over complex, irregular shapes that the other tools can't handle.
All these tools now live in your main toolbar. Long-press the mask tool group to see all options and switch between them quickly.
Step 1: Create Your First Object Mask
Start by selecting a clip in your timeline. The object masking works best when you begin from a frame where your subject is clearly visible and unobstructed.
Grab the Object Mask Tool from your toolbar. As you move your cursor over the Program Monitor, you'll see Premiere Pro automatically highlighting objects it can detect. This hover preview is incredibly helpful because you can see exactly what the AI is identifying before you commit to a selection.
Click on any highlighted object to create an instant mask. The AI analyzes the entire object boundary and creates a precise selection that often rivals manual masking work that would take much longer.
If the object you want isn't being highlighted automatically, you have two backup options. Switch to rectangle mode and draw a rough box around your subject, or use lasso mode to draw a loose outline. The AI will then detect the object within that area and create the proper mask.
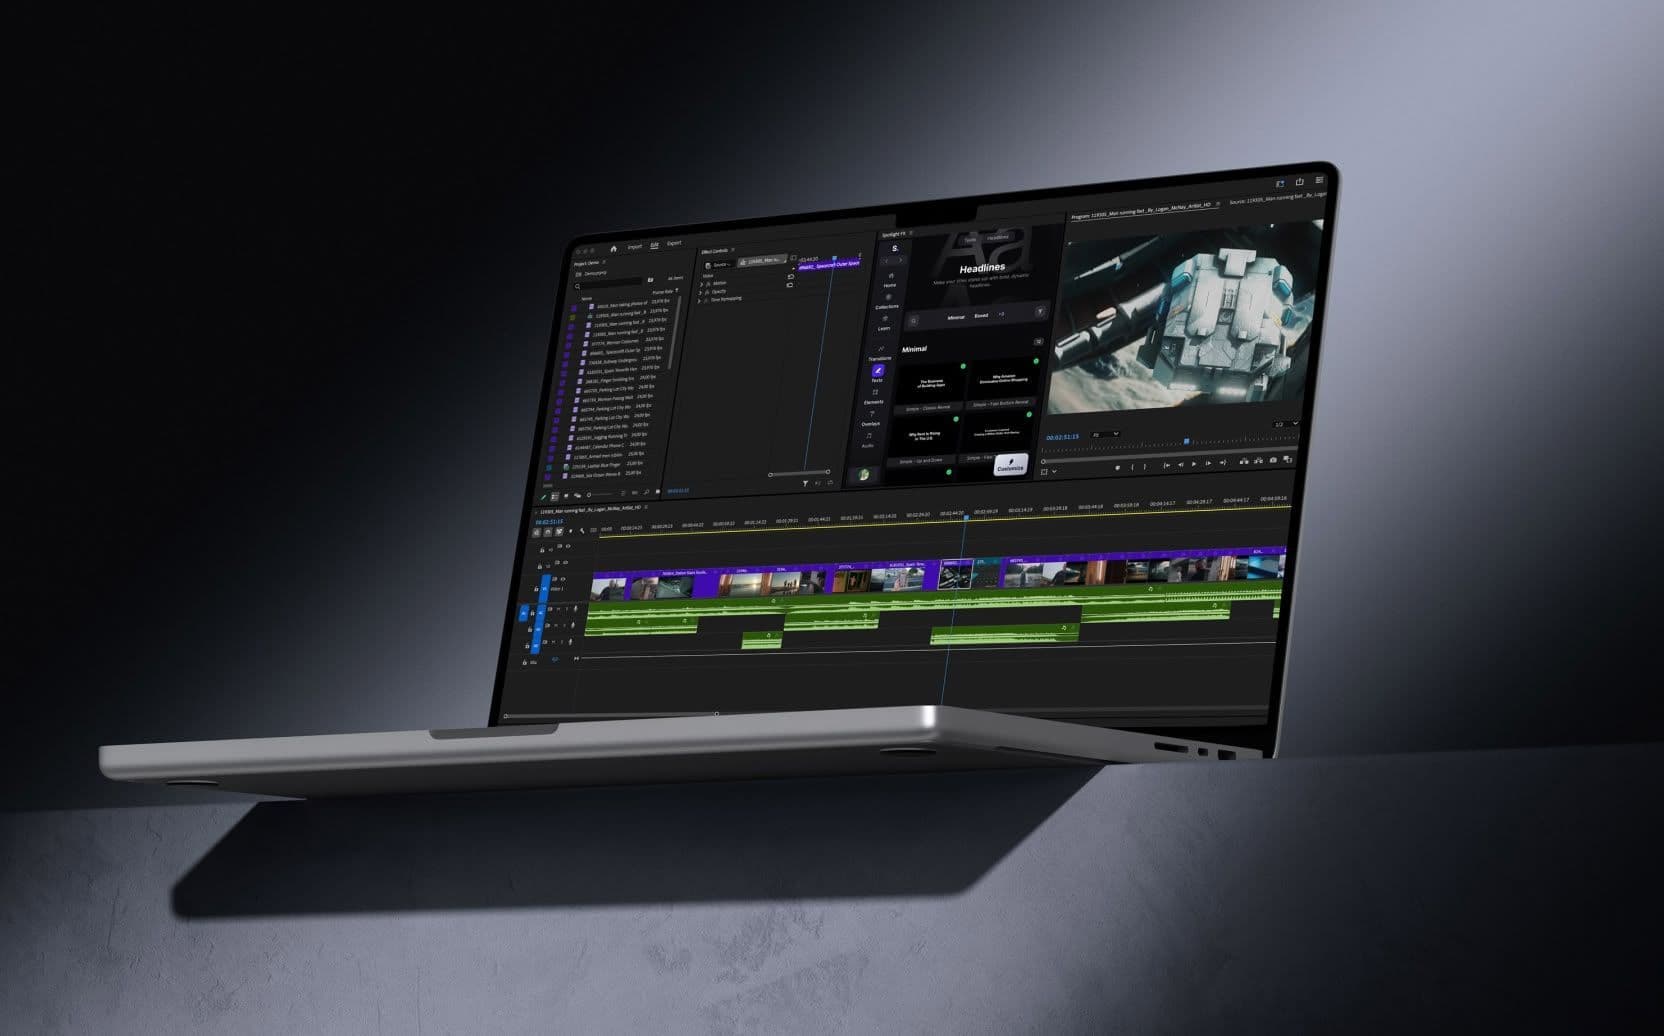
Step 2: Track Motion Across Your Clip
Once you've created your object mask, you'll find it listed in the "Unassigned Masks" section of the Effect Controls panel. This is where the real magic happens.
You have several tracking options:
- Bi-directional tracking processes your entire clip in one shot, starting from your current frame and working both forward and backward
- Forward tracking goes from your current position to the end of the clip
- Backward tracking moves from your current frame to the beginning
- Single frame tracking lets you move just one frame at a time for precise control
For most situations, bi-directional tracking is your best bet. Click that button and watch Premiere Pro automatically follow your subject through camera movements, subject motion, and even partial occlusions. The tracking speed varies depending on complexity, but you can expect around 6-12 frames per second on most modern systems.
Step 3: Apply Effects to Your Masked Subject
Here's where the workflow becomes really smooth. With your object tracked, you can apply any effect and it will automatically use your mask.
Let's say you want to blur someone's face for privacy. Find the Gaussian Blur effect in your Effects panel and drag it onto your clip in the timeline. The moment you drop it, the effect automatically applies only to your masked area. No manual assignment needed.
The same works for color effects. Apply Lumetri Color and start adjusting skin tones, knowing your changes only affect the masked person. This selective application is what makes object masking so powerful for quick corrections.
Working with Shape Masks
While object masking gets most of the attention, the redesigned shape masks are worth understanding too. They've been completely rebuilt with better performance and more intuitive controls.
Ellipse masks now default to bounding box mode, which makes sense since they're primarily used for face work in color grading. You can scale, rotate, and position them quickly. Double-click to access individual points if you need more precise control.
Rectangle masks start in point-edit mode because rectangular objects in video are rarely perfect squares due to perspective. You can immediately adjust individual corners to match your subject. Double-click to switch to bounding box mode for basic scaling.
Pen masks work just like you'd expect from other Adobe apps. Click to create points, click and drag for curves, and click your starting point again to close the shape.
Advanced Mask Refinement Techniques
Sometimes the initial AI selection needs tweaking. The mask refinement tools let you add or subtract areas with surgical precision.
Use the plus (+) button to add areas that the AI missed. The minus (-) button removes unwanted sections. You can also hold Option (Mac) or Alt (Windows) to temporarily switch between add and subtract modes.
When refining, you have the same selection options as the initial mask creation. Click on highlighted objects to add or remove them completely, or use rectangle/lasso tools to select specific regions.
Combining Multiple Masks
One powerful feature is the ability to combine multiple masks using blend modes. You can create complex selections by layering object masks and shape masks together.
The blend modes work like this:
- Add combines all mask areas together
- Subtract removes the current mask area from masks above it
- Intersect keeps only areas where masks overlap
This lets you create sophisticated masks. For example, you might use an object mask to select a person, then subtract a rectangle mask to exclude their hands from the effect.
Tracking Performance and Quality Options
The new tracking system offers several parameters you can adjust based on your footage:
Position tracking handles basic X, Y movement and works for most situations.
Scale tracking accounts for subjects getting closer or farther from camera.
Rotation tracking follows objects that turn or rotate during the shot.
Perspective tracking handles complex 3D movement, like someone walking at an angle to the camera. When you enable perspective tracking, it automatically handles position, scale, and rotation as part of its calculations.
Choose the minimum parameters you need. More tracking options mean longer processing times, so if your subject only moves left and right, stick with position-only tracking.
Managing Mask Data and Projects
Object masks generate substantial data files that get stored next to your project in a folder named "[Project Name] Masks". This external storage keeps your actual project file size manageable and prevents performance issues.
When sharing projects that use object masking, you must include this mask folder. Without it, your object masks will show as offline and won't function. This is similar to how you need to include media files when moving projects between systems.
Traditional shape masks don't create external data, so they're not affected by this requirement.
Essential Keyboard Shortcuts and Tools
Here's a complete reference for the most useful masking shortcuts:
Action | Windows Shortcut | Mac Shortcut | Notes |
|---|---|---|---|
Object Mask Tool | Cmd + Opt + O | Cmd + Opt + O | Creates new object mask |
Change Selection Mode | Cmd + Opt + L | Cmd + Opt + L | Toggle rectangle/lasso |
Add to Mask | + (plus key) | + (plus key) | Or hold Alt while selecting |
Subtract from Mask | - (minus key) | - (minus key) | Or hold Alt while selecting |
Nudge Mask 1px | Arrow Keys | Arrow Keys | With mask selected |
Nudge Mask 10px | Shift + Arrow Keys | Shift + Arrow Keys | With mask selected |
Toggle Bounding Box | Double-click | Double-click | On mask shape |
Scale Proportionally | Shift + Drag Corner | Shift + Drag Corner | In bounding box mode |
Rotate Mask | Hover Near Corner | Hover Near Corner | Look for rotation cursor |
Troubleshooting Common Issues
Tracking drifts or picks up wrong objects: This usually happens with complex backgrounds or similar-looking objects. Try starting your mask from a cleaner frame where the subject is more isolated. You can also reduce the tracking area by using subtract masks to exclude problematic regions.
Mask edges look jagged: Increase the feather value in your Effect Controls panel. Start with 5-10 pixels and adjust based on your footage resolution. Higher resolution footage typically needs more feather for natural-looking edges.
AI won't detect my object: The current models work best with people, vehicles, and common objects. For unusual subjects or very small objects in frame, you might need to use the rectangle or lasso selection modes to help the AI understand what you want to mask.
Tracking takes too long: Disable tracking options you don't need. If your subject only moves horizontally, turn off scale and rotation tracking. Also, consider tracking shorter sections at a time rather than entire clips.
Best Practices for Professional Results
Start masking from the clearest, most representative frame of your subject. The AI creates better initial selections when the object is fully visible and well-lit.
Use the mask overlay feature to check your work. You can choose different colors (red, green, blue, cyan, magenta, yellow) or black and white to see the alpha channel. Pick a color that contrasts well with your footage.
For faces, combine object masking with traditional ellipse masks. Use object masking to get the initial selection and tracking, then add a feathered ellipse mask to create smoother edges around the face area.
When working with multiple subjects, create separate object masks for each person. This gives you independent control over tracking and refinement for each subject.
Performance Tips and System Requirements
Object masking requires downloading AI models the first time you use it. This happens automatically, but you'll see a loading indicator in your Program Monitor during the download. Check the Progress panel to monitor download status.
The tracking performance varies significantly based on your system specs and footage complexity. Modern GPUs will process tracking much faster than older hardware. Complex scenes with multiple moving objects will naturally take longer than simple subjects against clean backgrounds.
If tracking is too slow for your workflow, consider creating proxy media at a lower resolution for the masking work, then applying your finished masks to the full-resolution footage.
Integration with Other Premiere Pro Features
Object masks work seamlessly with all Premiere Pro effects. Color correction, blur effects, distortion, and even third-party plugins will automatically respect your mask boundaries.
You can also export your masked clips to After Effects if you need more advanced compositing work. The masks transfer as standard After Effects masks, maintaining all your tracking data.
For motion graphics work, try combining object masks with Premiere Pro's Essential Graphics templates. You can create templates that automatically apply to masked subjects, making repetitive tasks much faster.
What's Coming Next
Adobe has indicated this is just the beginning for AI-powered editing tools in Premiere Pro. The current beta focuses on object detection and tracking, but future updates may include automatic mask refinement, better edge quality, and support for more object types.
The feedback system built into the beta lets you rate mask quality and report issues directly to Adobe's development team. Using this helps improve the AI models for everyone.
Getting Professional Results
The key to professional-looking masked effects is subtlety. Heavy-handed corrections or poorly feathered edges immediately reveal that masking was used. Start with gentle adjustments and build up the effect gradually.
Pay attention to edge quality throughout your timeline. What looks good on one frame might need adjustment a few seconds later as lighting or angles change. The tracking system handles motion well, but you may need to adjust feather or expansion values for different parts of your clip.
For client work, always keep unmasked versions of your effects as backup. You can do this by duplicating your timeline or using adjustment layers that can be easily disabled.
Object masking in Premiere Pro represents a significant step forward for video editors who need quick, professional results without the complexity of After Effects. Once you get comfortable with the workflow, you'll find yourself reaching for these tools constantly. The combination of AI-powered detection and traditional manual controls gives you the best of both worlds: speed when you need it, precision when you want it.
Frequently Asked Questions
How do I access object masking in Premiere Pro?
You need Premiere Pro Beta version 25.6 build 48 or later. Enable "New Masking" from the beta menu or click "Enable new masking" when prompted at startup. Remember that projects using this feature won't open in standard Premiere Pro versions.
Can I use object masking on any type of footage?
Object masking works best with people, vehicles, and common objects. The AI models are trained on typical subjects, so unusual objects or very small subjects in frame might require manual selection using rectangle or lasso modes.
What happens to my mask data when I move projects?
Object mask data is stored in a folder next to your project file named "[Project Name] Masks". You must include this folder when sharing or moving projects, similar to including media files. Without it, object masks will appear offline.
How fast is the tracking process?
Tracking speed varies from 6-12 frames per second depending on your system specs and footage complexity. Simple subjects against clean backgrounds track fastest, while complex scenes with multiple moving objects take longer.
Can I edit object masks after tracking?
Yes, you can refine masks using add (+) and subtract (-) tools even after tracking. You can also adjust mask properties like feather, expansion, and opacity in the Effect Controls panel without losing your tracking data.